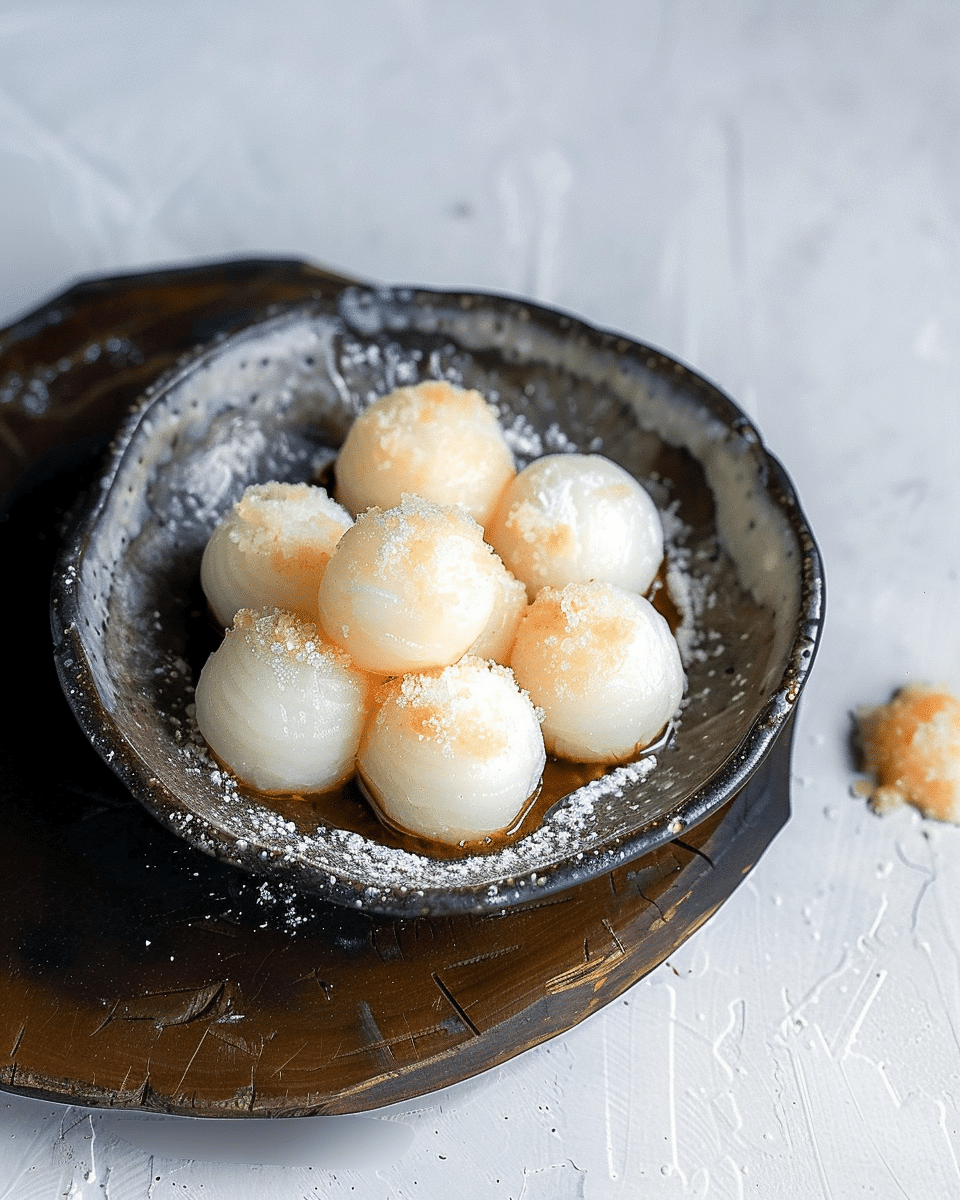
Shiratama Dango, also known as Japanese rice dumplings or mochi balls, are a chewy, delightful treat often enjoyed as part of Japanese desserts. These small, soft, and smooth mochi balls can be served with fruits, drizzled with syrup, or paired with ice cream for an extra indulgent experience. Whether you’re new to Japanese sweets or a longtime fan, this easy-to-follow recipe will guide you through making these chewy morsels at home in just 15 minutes!
Why You’ll Love This Recipe
Shiratama Dango offers a perfect balance of chewy texture and sweetness. These rice dumplings are versatile, allowing you to pair them with a variety of toppings like dark brown sugar syrup (kuromitsu) or roasted soybean powder (kinako). They’re perfect for enjoying on their own or served with fruits or desserts like ice cream. Plus, they’re surprisingly easy to make with minimal ingredients—ideal for satisfying your sweet cravings!
Ingredients
For the Rice Dumplings:
-
If using Shiratamako (preferred method):
-
100g glutinous rice flour (shiratamako)
-
90ml water (approximately)
-
-
If using Mochiko (alternative method):
-
90g glutinous rice flour (mochiko)
-
10g potato starch (katakuriko) or tapioca starch
-
80ml water (approximately)
-
Optional Toppings:
-
Dark brown sugar syrup (kuromitsu)
-
Roasted soybean powder (kinako)
Tip: You can find these ingredients in Asian grocery stores or specialty online shops. If you’re unable to find some of the ingredients, check my substitution guide for alternatives.
Instructions
Step 1: Prepare the Dough
-
Measure 100g of shiratamako (glutinous rice flour) into a bowl and whisk it for a smooth texture.
-
Measure 90ml of water. Pour half of it into the bowl and stir gently with a spatula.
(If using mochiko, mix 90g of mochiko with 10g of potato starch. Then add 80ml of water and pour in half of it to begin with.)
-
Gradually add the rest of the water, little by little, mixing after each addition until you form a smooth dough. You want the dough to have the texture of an earlobe. Be cautious not to add too much water—add just enough to get a smooth and elastic dough.
Step 2: Shape the Dango
-
Boil a pot of water for cooking the dango while you shape the dough.
-
Divide the dough into equal sections (e.g., half if you’re following the standard recipe). Roll each section into cylinders.
-
Cut each cylinder into approximately 10 even pieces and roll them into small balls. Press gently in the center to create a slight indentation in each ball.
-
Place the shaped dango on a sheet of parchment paper to prevent them from sticking.
Step 3: Cook the Shiratama Dango
-
Once the water is boiling, gently add the rice dumplings (dango) to the pot. Use chopsticks to gently nudge them so they don’t stick to the bottom.
-
Boil until the dango float to the surface, which should take around 3 minutes.
-
After they float, set a timer for 1 minute. Prepare a bowl of ice-cold water for cooling.
Step 4: Cool and Serve
-
Turn off the heat and use a mesh spoon to carefully transfer the dango into the bowl of ice water. Let them cool for about 5-10 minutes.
-
Once they’ve cooled, drain the water and serve the dango with dark brown sugar syrup (kuromitsu) and roasted soybean powder (kinako), or enjoy with your favorite toppings.
Step 5: Storage and Leftovers
-
If you have leftovers, place the dango spaced out on a tray lined with baking paper and freeze them for 1 hour. After 1 hour, transfer them to a sealable freezer bag for longer storage.
-
The frozen dango can be stored for up to 1 month. When ready to eat, thaw them in the microwave for 40-50 seconds or soak them slowly in a bowl of water.
Notes & Variations
-
Toppings: Shiratama dango can be served with a variety of toppings. Kuromitsu (dark brown sugar syrup) is the most common, but kinako (roasted soybean powder) adds a nutty flavor. You can also serve them with a drizzle of honey or even some fresh fruit for a more refreshing twist.
-
Flavor Variations: For a fun twist, you can mix a little matcha powder into the dough for a green tea flavor, or try adding sweetened red bean paste (anko) inside the dango before boiling for a surprise filling.
-
Mochiko vs Shiratamako: While shiratamako (glutinous rice flour) is the preferred ingredient for a chewy, soft texture, mochiko (a similar rice flour) can be used as an alternative if needed. The texture may be slightly different, but it will still be delicious!
Heating & Storage Information
-
Storing Leftovers: If you have leftover shiratama dango, store them in the fridge for up to 2 days in an airtight container.
-
Reheating: To reheat, warm the dango in the microwave for about 30-40 seconds or soak in warm water to return them to their chewy texture.
FAQs
Q1: Can I make these ahead of time?
Yes, you can prepare the dango ahead of time and store them in the fridge for a day or freeze them for longer storage. Simply thaw and reheat when ready to serve.
Q2: Can I use a different flour instead of glutinous rice flour?
Glutinous rice flour is key to achieving the chewy texture. If you can’t find shiratamako or mochiko, try searching for other brands of glutinous rice flour at your local Asian market.
Q3: Can I make flavored dango?
Absolutely! You can infuse the dough with matcha, cocoa powder, or even sweetened red bean paste for a variety of flavors.
Q4: Can I make these without ice water?
The ice water step helps to firm up the dango and gives them the right texture. It’s recommended, but if you don’t have ice water, you can skip it and cool them on a plate.
Q5: What can I serve Shiratama Dango with?
Shiratama dango can be served with syrup, fruit, ice cream, or even as a topping in traditional desserts like Anmitsu or Kakigori (shaved ice).
Conclusion
Shiratama Dango is a delightful and versatile Japanese treat that’s perfect for any occasion. With a chewy, satisfying texture and endless options for toppings, it’s a fun dessert to make and enjoy. Whether you’re serving them with syrup, roasted soybean powder, or alongside ice cream, these little rice dumplings are sure to become a favorite in your household!
Print
Shiratama Dango (Rice Dumplings/Mochi Balls)
- Total Time: 15 minutes
- Yield: 4-6 servings (depending on the size of the dango)
- Diet: Vegan
Description
Shiratama Dango, also known as Japanese rice dumplings or mochi balls, are a chewy, delightful treat enjoyed in many traditional Japanese desserts. These small, soft, and smooth mochi balls are easy to make at home in under 15 minutes. Served with a variety of toppings like dark brown sugar syrup (kuromitsu), roasted soybean powder (kinako), or paired with ice cream, they offer a perfect balance of sweetness and chewy texture. Whether you’re new to Japanese sweets or a longtime fan, this recipe is a fun and delicious way to enjoy a beloved Japanese treat!
Ingredients
For the Rice Dumplings:
Shiratamako (preferred method): 100g glutinous rice flour
Water: 90ml (approximately)
OR
Mochiko (alternative method): 90g glutinous rice flour, 10g potato starch (katakuriko or tapioca starch), 80ml water (approximately)
Optional Toppings:
Dark brown sugar syrup (kuromitsu)
Roasted soybean powder (kinako)
Instructions
Step 1: Prepare the Dough
-
In a bowl, whisk 100g of shiratamako (glutinous rice flour) to ensure a smooth texture.
-
Add 90ml of water, pouring in half at a time while gently stirring to combine.
(Alternative method: Mix 90g of mochiko with 10g of potato starch. Then, gradually add 80ml of water, stirring after each addition.)
-
Gradually add the rest of the water, mixing carefully until a smooth dough forms. The dough should have the texture of an earlobe—elastic and smooth. Be cautious not to add too much water at once.
Step 2: Shape the Dango
-
Bring a pot of water to a boil for cooking the dango while you shape the dough.
-
Divide the dough into equal sections. Roll each section into cylinders and cut them into approximately 10 equal pieces.
-
Roll each piece into small balls, pressing gently in the center to create a slight indentation.
-
Place the shaped dango on parchment paper to prevent sticking.
Step 3: Cook the Shiratama Dango
-
Once the water is boiling, gently drop the rice dumplings (dango) into the pot.
-
Stir occasionally with chopsticks to prevent sticking.
-
When the dango float to the surface (about 3 minutes), set a timer for 1 more minute.
-
Prepare a bowl of ice-cold water for cooling.
Step 4: Cool and Serve
-
Turn off the heat and use a mesh spoon to transfer the dango into the ice-cold water. Let them cool for 5-10 minutes.
-
After they cool, drain the water and serve with optional toppings such as kuromitsu (dark brown sugar syrup) or kinako (roasted soybean powder).
Step 5: Storage and Leftovers
-
If you have leftovers, freeze the dango by placing them on a tray lined with parchment paper for 1 hour. Then transfer to a sealable freezer bag.
-
Frozen dango can be stored for up to 1 month. To serve, thaw them in the microwave for 40-50 seconds or soak them in warm water.
Notes
- Toppings: Shiratama dango is traditionally served with kuromitsu (dark brown sugar syrup) or kinako (roasted soybean powder). For a more refreshing twist, drizzle with honey or add fresh fruit.
- Flavor Variations: You can infuse the dough with matcha powder for a green tea flavor, or try sweetened red bean paste (anko) as a surprise filling inside the dango.
- Mochiko vs Shiratamako: Shiratamako gives the best chewy texture, but mochiko is a suitable alternative with a slightly different texture.
- Prep Time: 10 minutes
- Cook Time: 3 minutes (for boiling)
- Category: Dessert
- Method: Boiling
- Cuisine: Japanese

